


 When I first wrote “10 Tips to Become an Exclusively Pumping Rockstar” last fall, I honestly wasn’t sure how many women would relate to the topic. But simply due to the number of shares the post received, it quickly became apparent that exclusively pumping was much more prevalent than I had initially thought, which I found to be both exciting and fascinating. Since then, as I have continued along my pumping journey, I have learned many more “tricks of the trade.” I also have had a few mamas reach out and ask about some topics that I did not cover the first time around. So, I figured it was time for a sequel!
I hope this post is just as useful as the first! (and don’t forget to read the first ten tips here!)
11. Vinegar is magic. Seriously.
I spent months using fancy soap and tearing up sponges, attempting to get my pump parts and bottles as clean as possible. One day, I came across a post on one of my mommy Facebook pages that suggested using vinegar to clean off any buildup. I was a bit wary that the potent smell would never leave the plastic, but after soaking everything in a vinegar/warm water mix (a 3:1 ratio) for 30 minutes, they looked brand new! And the most exciting part – they did not stink! I was stunned and overjoyed! So, go on out and buy the biggest vat of vinegar you can find, and douse your parts with it. (Disclaimer – this may result in a craving for marshmallow Peeps since your kitchen will temporarily smell like you spent the afternoon dying Easter eggs. You’ve been warned.)
12. To sterilize or not to sterilize?
I cannot tell you how many hours my husband and I spent boiling water every day to sterilize all bottles and pump parts. When my daughter was about eight weeks old, due to the insanity of going back to work, I started skipping days here and there until I finally stopped the boiling altogether. I felt super guilty and thought I was somehow doing wrong by my daughter. After confessing to some mom friends and our pediatrician, I learned that sterilization is actually an outdated practice. Soap and hot water are more than sufficient. Hallelujah!
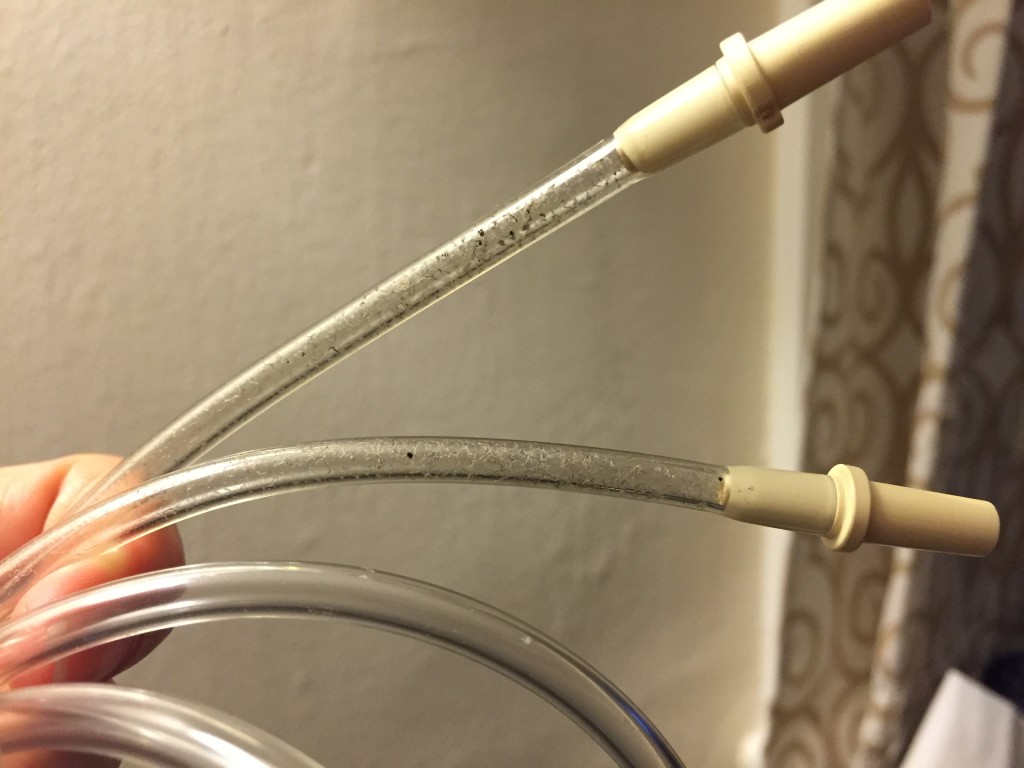
13. Replace your parts.
This is a segment of my pumping equation that, even 14 months in, I am still trying to perfect. Due to wanting to be fiscally responsible and still get the best output, I change my membrane parts once every two months. I have read A LOT of conflicting timelines on this, but I must say that I do not pull the membranes off of the valve when I clean my parts, which most definitely lengthens their life span. And when I need more, I prime a box! (Yes, I use “prime” as a verb). Don’t forget that it is essential to always (!!!) have a backup set of membranes on hand, in case one tears. As for tubes, if you don’t replace them, they will get nasty! I initially went much longer than I like to admit without replacing them because Medela did not make the ones sold on Amazon (I have an Amazon addiction, I admit it!). I was fearful this would cause an issue. When I finally did buy them, my pump continued to work without a problem, and I learned that the 3rd-party brand tubes were perfectly fine.
14. Pump on the road.
Before I actually pumped in the car for the first time, I thought it was a totally crazy concept. But on the way to a friend’s wedding, when I was running short on time, I gave it a try, and it has been a super useful time-saving mechanism ever since! My pump did come with a battery pack, but the suction from it, well, sucks. So, I invested in a car adapter, which works much better! Some amazing pumping moms even pump on their way to/from work, which (in case you are wondering) I have never done; I have always been the passenger while pumping. If you think it’ll work for you, give it a try! Just please don’t try to hook-up and unhook unless you are parked!
15. Be careful when dropping pumps.
Whenever you decide to drop your number of daily pumps, there is always a risk that your total number of daily ounces will decrease. The question of exactly how many ounces you will lose varies from pumper to pumper, so it is almost impossible to know until you actually try it. When I dropped from 6 pumps a day down to 5, my ounces nearly stayed the same. Honestly, I was pumping more with 5 pumps for the first few days than I had been with 6. But when you start getting closer to only 2 or 3 pumps a day, you most likely will see quite a decrease. This is because you are essentially telling your body that your baby doesn’t need to eat as much, and therefore, you stop producing as much milk. I lost the most ounces a day (around 15) when I dropped from 3 pumps a day down to 2. Thankfully, I was prepared for this and started using my freezer stash, but it still was quite an adjustment. If you drop a pump, and the decrease is too great, add that pump back in! Just note that it may take a while for your ounces to increase again.
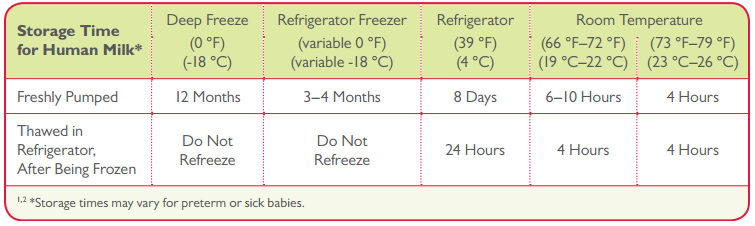
16. Be aware of storage guidelines.
The chart below serves as a great guide for how long milk can be stored and at what temperatures. The room temperate plays a huge role in how long milk can sit out. Believe me; I have learned this the hard way! It is also best to keep frozen milk in the deepest part of the freezer, meaning NOT in the freezer door. The temperature fluctuates too much in this space since the milk will be exposed to warm air every time the door is opened.
17. How to freeze…
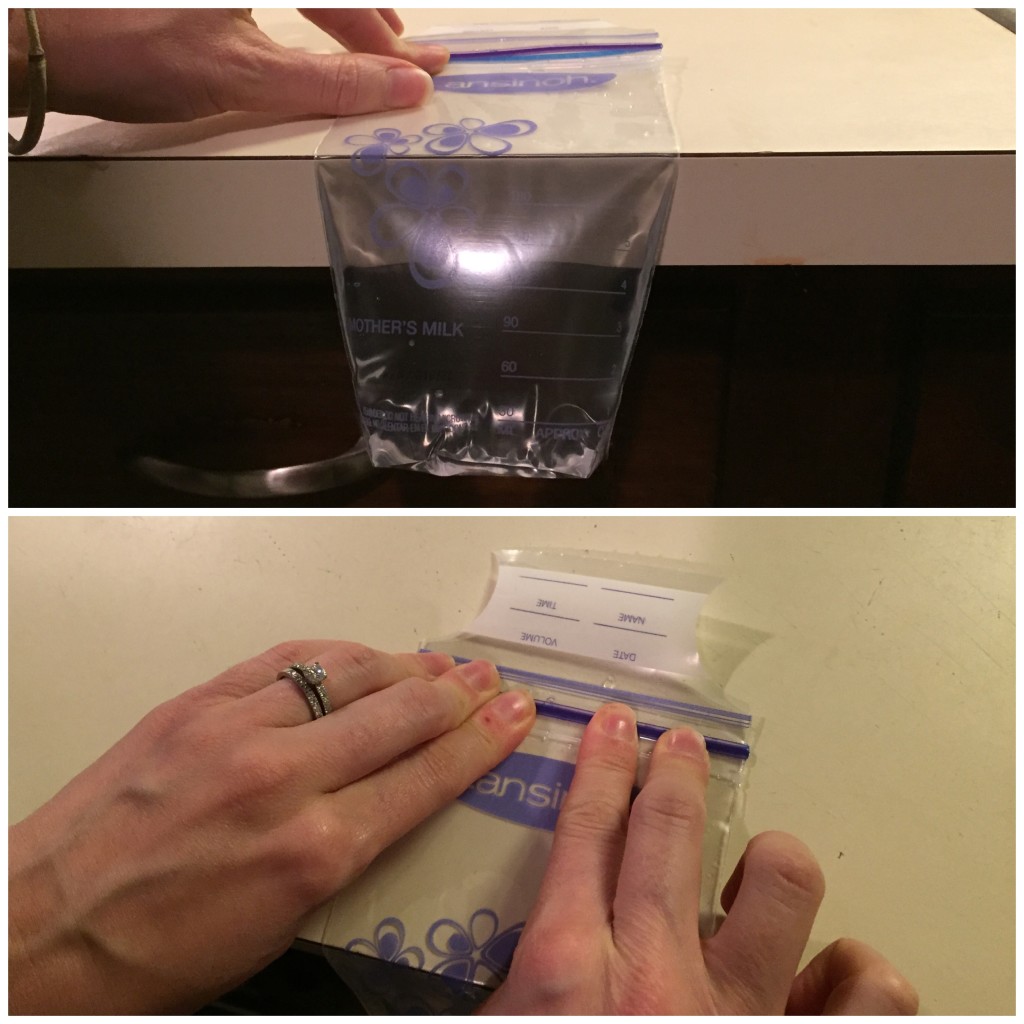
Freezing milk can be a bit stressful since it’s only natural to worry about what may happen to your liquid gold once it goes into the frigid, dark abyss. Here are few important things to note about the freezing process: First, you will need to invest in a container to store your milk. I have found sterile storage bags to be the easiest to use. I have bought both the Target “Up and Up” brand and the Lansinoh brand; no complaints about either option. Second, be sure to freeze milk that is already cold. If you want to freeze what you just pumped, let it cool down in the fridge first. Third, try to get as much air out of your storage bags as possible. The photo below shows a trick that I have for this. And last, to make the best use of space, try to freeze the bags flat. This will allow you to store lots of bags during your stash building process.
18 …and then unfreeze breastmilk.
Breastmilk should be used within 24 hours of thawing, so it is important not to thaw too much at one time. Also, since some babies don’t like the taste of previously frozen milk, it is a good idea to keep non-alcoholic vanilla extract on hand so that you can add a few drops to the milk, but only if your baby refuses it without. You can also mix half fresh milk with half previously frozen milk to mask the frozen taste.
19. Don’t obsess over ounces.
In all honesty, this was a challenge for me until my daughter was almost a year old. My “Baby Feed” app was always open on my phone, and it was essential for me to enter the number of ounces I had pumped at the end of every session. But why? I knew I was (thankfully) making enough for my daughter, so what was with the personal competition to out-do my previous days worth of ounces? All it did was stress me out, and it would make me worry that something was wrong if I pumped 2 or 3 fewer ounces in a day than “usual.” So I ditched the ounce tracking and found peace with the fact that I was doing the best that I could, regardless of any exact number of ounces pumped.
20. Feed all the babies!
This is more a teaser than a tip since I plan to write a future post about donating breastmilk. Donating has been one of the most fulfilling (and unexpected) parts of mommyhood for me, and I can’t wait to share!
Pump on, mamas! Do you have anything to share?


Awesome article. It’s been a huge help. My daughter is 10 mo old I pump while working & nurse when home. So happy I came across your articles. I am anxiously waiting for your article about donating breast milk. I’ve been thinking about doing it, but not sure of the process etc… Please post soon!